

Key Takeaways:
- • Building a DIY tree branch chandelier brings a unique, natural touch to your home.
- • Properly selecting, cleaning, and drying your branch is crucial for looks and safety.
- • Safe wiring is the most important step; consult an electrician if unsure.
- • You’ll need basic tools like drills, wire strippers, and sandpaper.
- • Customisation is key – paint, stain, or leave the branch natural. Add crystals, different bulbs, or unique wiring patterns.
- • Check out different styles of branch chandeliers for inspiration before you start.
Getting Your Gear Together: Tools and Bits
So, you wanna make one of these branch chandeliers, eh? Good on ya. First things first, you gotta get your kit sorted. It’s not super complicated, but havin’ the right stuff makes the job way easier and, more importantly, safer. You don’t want bits falling down or sparks flying where they shouldn’t. You’ll need a few basic things, most of which you might already have if you do a bit of DIY round the house. Check out this list of essential tools for DIY projects if you want a more general idea, but for this project, think specific.
You definitely need a drill. A cordless one is handiest, lets you move around without tripping over wires. You’ll need different sized drill bits too – smaller ones for pilot holes where screws go, and a bigger one (like a spade bit or Forstner bit) to make channels or holes for the electrical wiring to run through or sit in. Think about how thick your wires are and how you want to hide ’em. Then, wire strippers and cutters are a must. Don’t try using scissors or a knife, you’ll likely damage the wires or yourself. Get a proper pair, they’re cheap enough. Pliers, both regular and needle-nose, will be your best friends for twisting wires together and holding small bits.

Sandpaper is another essential. Different grits, probably. A rough one to start, to get rid of flaky bark or smooth out rough cuts, then a finer one to get it nice and smooth to the touch, ‘specially if you plan on painting or staining it. You’ll need screws and maybe some wood glue, depending on how you construct it and attach the light fittings. For the lighting part, you need lamp holders (the bits the bulbs screw into), electrical wire (make sure it’s rated for household lighting), light bulbs (LEDs are great, they run cool), and wire connectors (like wire nuts). And of course, you need a way to hang the whole thing – strong ceiling hooks, chain, or sturdy wire rated for the weight. Don’t forget safety gear! Goggles are a must when drilling or cutting, and gloves aren’t a bad idea when handling rough wood or wiring. Having this stuff ready before you start makes the whole process smoother, trust me. Lay it all out, makes ya feel organised.
Finding and Prepping the Star: The Branch
Alright, got your tools? Cool. Now for the main event – the branch itself. This part’s kinda fun, like goin’ on a treasure hunt. You can’t just grab any old twig though. Look for a hardwood branch if possible – oak, maple, something sturdy. Softwoods like pine might be too brittle or might decay quicker. The branch needs to be strong enough to hold the weight of the light fittings and itself without sagging or breaking. Size and shape are totally up to you and where you plan to hang it. Want something dramatic over a dining table? Look for a longer, sprawling branch. Need something smaller for a cozy corner? A more compact, interesting shape might work. Have a wander through woods (if you’re allowed to take fallen branches!), parks, or even your own garden after a storm. Look for naturally fallen wood – it’s usually drier to start with.
Once you’ve found your perfect branch, the prep work begins. This step is super important, don’t skip it. First, clean it up. Brush off all the loose dirt, cobwebs, and any flaky bark you don’t want. A stiff brush works wonders. You might need to scrub it a bit if there’s stubborn moss or grime. Some folks even give it a gentle wash with soapy water, but make sure you let it dry completely afterwards. And I mean completely. Drying can take weeks, even months, depending on the thickness of the wood and your climate. Bring it indoors, put it somewhere warm and dry, like a garage or shed. You want it properly seasoned so it doesn’t warp, crack, or shrink later, potentially messing up your wiring or fixings. Patience here is key. Rushing the drying process is one of the common mistakes to avoid.

After its dry, inspect it for any bugs or woodworm holes. You don’t want creepy crawlies making a home in your new light fixture. If you suspect anything, you can treat the wood. There are commercial wood treatments, or some people carefully bake the branch in an oven on a very low heat for a while (be extremely careful with this method, wood is flammable!). Once you’re happy it’s clean, dry, and bug-free, you can decide on the finish. Sand it smooth, like we talked about. Then you can leave it natural, apply a clear sealant to protect it and bring out the grain, stain it a darker colour, or even paint it – white, black, metallic, whatever fits your room’s style. Think about those cool DIY rustic decor ideas for inspiration. This branch is your canvas.
Wiring It Up Without the Sparks: Safety First!
Okay, this is the bit where you gotta be really careful. Mucking about with electricity isn’t a joke. If you feel even slightly unsure about wiring, please, please get a qualified electrician to check your work or do this part for you. Seriously. It’s not worth the risk. That said, basic lamp wiring isn’t rocket science if you follow the rules. Always follow DIY lighting safety tips. First rule: make sure whatever you’re connecting this to is switched off at the mains. Not just the light switch on the wall, but the breaker in your fuse box. Double check it. Triple check it.
You’ll be running wire along or through your branch to connect the lamp holders. Plan your route. Do you want the wires hidden in grooves you cut or drilled? Or maybe wrap them around the branch for a more industrial look? If hiding them, use your drill and chisel (carefully!) or a router to create channels on the top or back side of the branch where they won’t be seen. Make sure the channels are deep enough so the wire sits flush and isn’t pinched. Use insulated staples designed for wiring (not regular staples!) to hold the wire in place within the channels, but don’t staple through the wire insulation. If wrapping, choose a decorative wire or cord that complements your design.

Connecting the lamp holders: Each lamp holder will have connection points, usually screws, for the live (often brown or black) and neutral (often blue or white) wires. There might also be an earth connection (green/yellow). Your electrical wire will typically have two or three inner wires matching these. Strip a small amount of insulation off the end of each wire (about 1cm or half an inch). Twist the copper strands tight. Loosen the screw on the lamp holder terminal, loop the wire around it in the direction the screw tightens (usually clockwise), and tighten the screw firmly. Make sure no stray copper strands are sticking out. Connect live to live, neutral to neutral. If you have an earth wire and your lamp holders are metal, connect the earth too. All the lamp holders will usually be wired in parallel. This means you run a main wire pair along the branch, and then tap off smaller wires from this main pair to each individual lamp holder (live to live, neutral to neutral). Use proper wire connectors (like screw-on wire nuts or lever connectors) for these junctions. Ensure all connections are secure and fully insulated – no bare copper showing! The final wires need to run up to where the chandelier connects to your ceiling power source. Again, if this sounds confusing, check a detailed step-by-step DIY guide or call a pro. Better safe than sorry, yeah?
Putting It All Together: The Grand Assembly
Right, branch prepped? Wiring planned (or done by a pro)? Tools ready? Now for the assembly line. This is where your branch starts looking like an actual chandelier. If you haven’t already, decide exactly where each light bulb (lamp holder) is gonna go. Mark the spots on the branch. Think about balance, both visually and physically. You don’t want all the lights clustered on one end making it hang wonky. Spread ’em out evenly or arrange them in a pattern that looks good from below. Use your drill to make holes for the lamp holder bases or for the wiring to pass through, depending on the type of holders you bought.
If you’re mounting the lamp holders directly onto the branch surface, drill pilot holes for the mounting screws. If you’re recessing them slightly, you might need that larger spade bit or Forstner bit we talked about earlier to create a shallow recess for the base to sit in. Get the holders screwed or fixed securely in place. Now, carefully route your wiring according to the plan you made. If you cut channels, lay the wire in neatly and secure it with those insulated staples. If you drilled holes for the wire to pass through the branch, thread it carefully. Make sure the wire isn’t stretched tight or pinched anywhere, especially around sharp corners or where it enters/exits a hole. Leave a little slack, but not so much that it looks messy.

Connect the wires to each lamp holder as we discussed in the wiring section – live to live, neutral to neutral, earth to earth (if applicable). Double check every connection is tight and insulated. Use wire nuts or connectors for joining wires together, ensuring they’re the right size for the number and gauge of wires you’re joining. Once all lamp holders are wired up, you’ll have the main feed wires ready to be connected to the ceiling power. Before you even think about hanging it, test your wiring if possible (a multimeter can check continuity safely, or have your electrician check it). Now, attach your chosen hanging hardware – chain, wire, or hooks – securely to the branch. Make sure these attachment points are strong and balanced. You might need two or more suspension points for a longer branch. This part combines steps from a good step-by-step build guide with practical assembly sense. Take your time, check everything twice.
Oops! Avoiding Those Common Goofs
Making stuff yourself is rewarding, but it’s easy to mess up, especially first time round. I’ve made a few mistakes myself over the years learnin’ this stuff. Knowing the common pitfalls beforehand can save you a headache, or worse. One biggie is picking the wrong branch. Too thin, too soft, too green, or full of bugs. We covered prep, but seriously, don’t skimp on drying. A damp branch can cause shorts, mould, or just look rubbish when it warps. Also, underestimating the weight is a common mistake. That branch plus all the fittings and wires can get heavy. Make sure your ceiling hook and the chain/wire you use are rated well above the final weight. And make sure you’re fixing into a ceiling joist or using a proper heavy-duty ceiling anchor, not just plasterboard. You don’t want your beautiful creation crashing down.
Wiring errors are probably the most dangerous mistake. Getting live and neutral mixed up, loose connections, using the wrong type of wire, or not earthing metal parts properly. These can lead to shocks, fires, or just lights that don’t work. As I keep saying, if you’re not 100% confident, get help. Another goof is poor planning of light placement. You hang it up, switch it on, and realize all the lights shine right in your eyes when you sit at the table, or it casts weird shadows. Think about the direction of the bulbs and the overall spread of light before you start drilling holes. Also, think about bulb choice before finalising wiring. Some fittings only take certain types or wattages. LEDs are generally best – low heat, low energy, long life. Incandescent bulbs can get real hot, which might not be great right next to wood.

Aesthetic mistakes happen too. Maybe the finish looks bad – patchy stain, paint drips. Take your time with the finishing touches. Sand properly between coats if painting or varnishing. Or maybe the scale is wrong – the chandelier looks tiny in a big room, or massive in a small one. Try mocking it up somehow, hold the branch up (carefully!) in the space before you commit. Forgetting about maintenance is another thing. How easy will it be to change a bulb? Will it be a dust magnet? A simple design is often easier to live with. Check out guides on common DIY mistakes like this one for more tips on what not to do. Learning from others’ oops moments is way less painful!
Branching Out: Styles Beyond Basic Rustic
Okay, so the classic branch chandelier is, well, rustic. Natural wood, maybe some Edison bulbs, looks great in a farmhouse or cabin style place. But don’t think you’re stuck with just that! You can take this basic idea and twist it into all sorts of cool styles. The branch is just your starting structure. Think about finish. Instead of natural wood, what about painting it? Glossy black for a modern, edgy look? Crisp white for a Scandi or coastal vibe? Or go glam with metallic paint – gold, silver, copper. A Luxe Gold Linear Branch Chandelier shows how elegant a painted branch can be. Suddenly it’s not just rustic anymore.
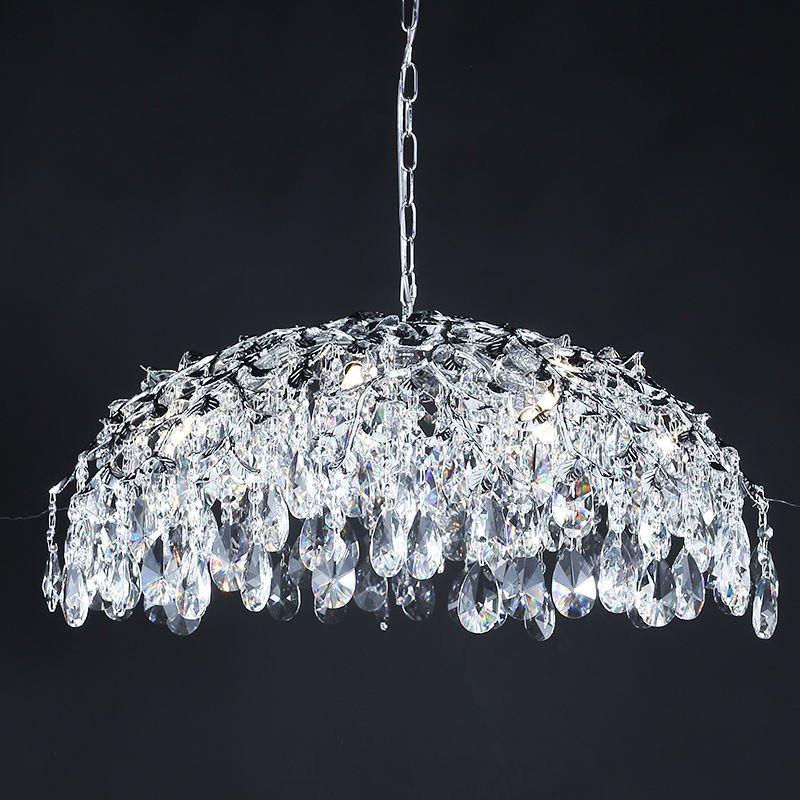
Then think about the lights themselves. Swap out simple bulbs for something more decorative. Crystal droplets hanging down? That immediately makes it more glam, like the Luxe Crystal Umbrella Branch Chandelier. You could use shades on the bulbs – small fabric ones, or maybe metal cage shades for an industrial feel. What about the bulbs themselves? Vintage-style filament LEDs come in all shapes and sizes now. Or use smart bulbs so you can change the colour and brightness with your phone. You could even wrap fairy lights tightly around the branch instead of, or as well as, traditional bulbs for a twinkly, magical effect.

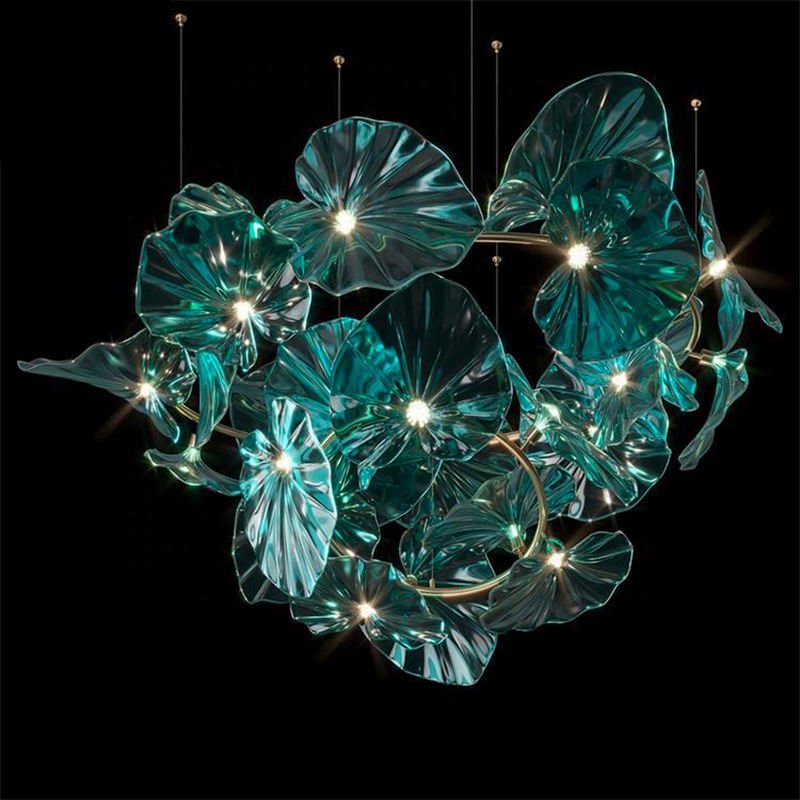
The shape of the branch influences the style too. A twisty, complex branch leans more organic or whimsical. A very straight, simple branch, maybe painted, could look quite minimalist or modern. You could even arrange multiple straight branches together in a geometric pattern before wiring them. Explore various styles of branch chandeliers online to get your imagination going. Maybe combine the branch with other materials? Wrap parts in rope or leather? Add metal accents? Some designs incorporate glass elements, like the beautiful Aqua Glass Lily Pad Floating Chandelier, showing how nature-inspired forms can use different materials. Don’t feel boxed in by the “branch” label. It’s a foundation you can build almost any style on, from super rustic for cozy spaces to surprisingly chic and modern.
Upcycling and Getting Creative: Make It Unique
This whole DIY thing is about making something personal, right? So why not push it further? Think about upcycling – using materials you already have or found objects to give your chandelier extra character. Got some old glass jars? Clean ’em up, and they can become cool shades around your bulbs. Drill a hole in the lid for the wire and lamp holder base. Old tin cans, painted or left raw, could work too for an industrial vibe. Maybe bits of old jewellery – chains, beads, crystals – could be draped from the branch for a bit of sparkle. Look at creative upcycling ideas to spark some inspiration.
You can also combine the branch with other natural elements. Pinecones wired on? Seashells drilled and hung if you’re going for a coastal look? Dried flowers or faux foliage woven around (just be careful to keep flammable stuff away from hot bulbs – another reason LEDs are good!). What about the wiring itself? Instead of hiding it, make it a feature. Use brightly coloured fabric electrical cord and wrap it decoratively around the branch. Or use copper pipe fittings and short lengths of pipe to house the lamp holders for a steampunk or industrial edge. This is where you can really let your personality shine through.

Consider combining the branch chandelier idea with other wood features in your room. If you have exposed beams or wooden furniture, choosing a branch and finish that complements them can create a really cohesive look. This guide on combining branch chandeliers with wood accents talks about creating that natural elegance. Maybe you found a piece of interesting driftwood on the beach? That brings a whole different texture and shape compared to a forest branch. Or perhaps an old wooden ladder section could be repurposed as the base structure instead of a single branch? The possibilities are pretty much endless once you start thinking outside the box. Look around your home, garage, or attic – what could be given a new life as part of your unique light fixture? That’s the real fun of DIY. For more ideas check out resources like this DIY Tree Branch Chandelier blog post or this guide on making one for Christmas.
Finishing Touches and Hanging Your Creation
You’ve built it, wired it (safely!), and styled it. Now for the final hurdle: getting it hung up and looking perfect. Before you hang it, give it one last check over. Any rough edges need sanding? Any paint touch-ups needed? Are all the wire connections secure and insulated? Is the hanging hardware firmly attached to the branch? Good. Now, the ceiling. As we said before, find a joist. Use a stud finder, or tap the ceiling listening for a solid sound. Drilling just into plasterboard won’t hold the weight. Once you’ve found a joist, drill a pilot hole and screw in a heavy-duty hook rated for significantly more than your chandelier weighs. If you absolutely can’t find a joist right where you want it, use a special heavy-duty ceiling anchor designed for hollow ceilings, again making sure its weight rating is sufficient.

Now, turn off the power to the existing ceiling light fixture at the breaker box. Always. Remove the old fixture if there is one. You’ll usually see wires coming from the ceiling (live, neutral, possibly earth). This is where you connect the wires from your new chandelier. Use wire connectors to join ceiling live to chandelier live, ceiling neutral to chandelier neutral, and ceiling earth to chandelier earth (if present). Follow the same careful connection process as before – strip wires, twist, connect securely, insulate properly. Gently push the connections up into the ceiling electrical box. You might need a ceiling canopy (that bowl-shaped thing that hides the wiring) to cover the hole and wires for a neat finish. These often come with new light fittings but can be bought separately. Attach the canopy.
Carefully lift your chandelier and hang it from the ceiling hook using the chain or wire you attached earlier. Adjust the chain/wire length so it hangs at the height you want. Stand back and check if it looks level. You might need to adjust the suspension points on the branch slightly if it’s tilting. Once you’re happy, screw in your chosen light bulbs. Now for the moment of truth! Go back to the breaker box, switch the power back on. Flick the light switch… and hopefully, your amazing, unique DIY tree branch chandelier lights up the room! Give yourself a pat on the back. You took a piece of wood and some wires and turned it into functional art. The history of rustic lighting is all about using natural materials, and you’ve just added your own chapter.
Frequently Asked Questions (FAQs)
Q: Is it safe to make my own light fixture?
A: It can be, but only if you understand basic electrical wiring principles and follow safety procedures meticulously. Always work with the power turned off at the breaker. Use correctly rated wires and components. Ensure all connections are secure and insulated. If you have any doubts, hire a qualified electrician. Safety first, always. Check out these DIY safety tips.
Q: What kind of branch is best?
A: A hardwood branch (like oak, maple, beech) that is thoroughly dried (seasoned) is best. Avoid green wood (it will shrink and warp) or softwoods that might be brittle. Make sure it’s free from rot or insect infestation. The size and shape depend on your space and desired look.
Q: How long does the branch need to dry?
A: This really varies depending on the wood thickness and humidity. It can take several weeks to several months. You want the internal moisture content to be low to prevent future problems. Bringing it indoors into a warm, dry place helps speed it up, but patience is key.
Q: How heavy will it be? How do I hang it safely?
A: Weight varies hugely based on branch size and materials. Weigh the finished chandelier if possible. Always use hanging hardware (hooks, chain, wire) rated for much more than the actual weight. Crucially, fix the ceiling hook directly into a ceiling joist or use a heavy-duty anchor designed for hollow ceilings if a joist isn’t available. Don’t rely on plasterboard alone.
Q: What type of light bulbs should I use?
A: LED bulbs are highly recommended. They produce very little heat (safer near wood), use less energy, and last much longer. They come in loads of styles, including vintage filament looks, and different colour temperatures (warm white, cool white). Avoid high-wattage incandescent bulbs that get very hot.
Q: Can I paint or stain the branch?
A: Absolutely! Clean and sand the branch well first. You can use wood stain, paint (latex, acrylic, spray paint), or a clear sealant. This lets you customize the look to match your decor perfectly.
Q: How do I clean my branch chandelier?
A: Dust will be the main issue. A regular feather duster or a soft brush attachment on your vacuum cleaner should work well. Be gentle around the wiring and bulbs. Make sure the power is off if you’re doing anything more than a light dusting.


